JPA and DukeScript
One of the benefits of using DukeScript for a client-server application is code reuse. You can use the same model classes on the client and the server. Our Maven Archetype CRUD with Jersey Faces is a good example of this.
In this tutorial we’ll change the project a bit to store the data in a database using JPA.
Creating the project
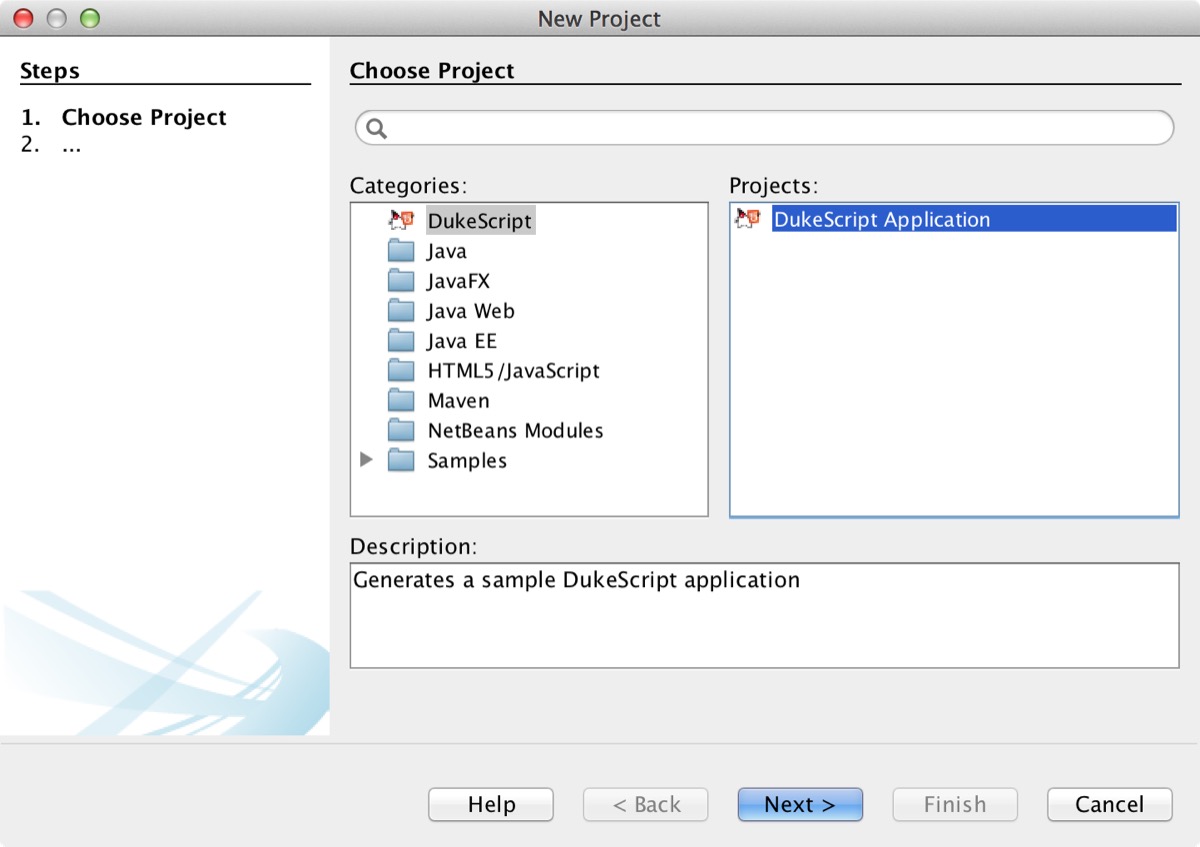
In NetBeans create a new project (File | New Project…). In the New Project wizard switch to category DukeScript. Choose the template DukeScript Application.
In step 2 choose “crud” as the artifact id. You could use a different name, but since this is used as part of the projects name it’s easier to understand what I’m referring to when we both use the same name here.
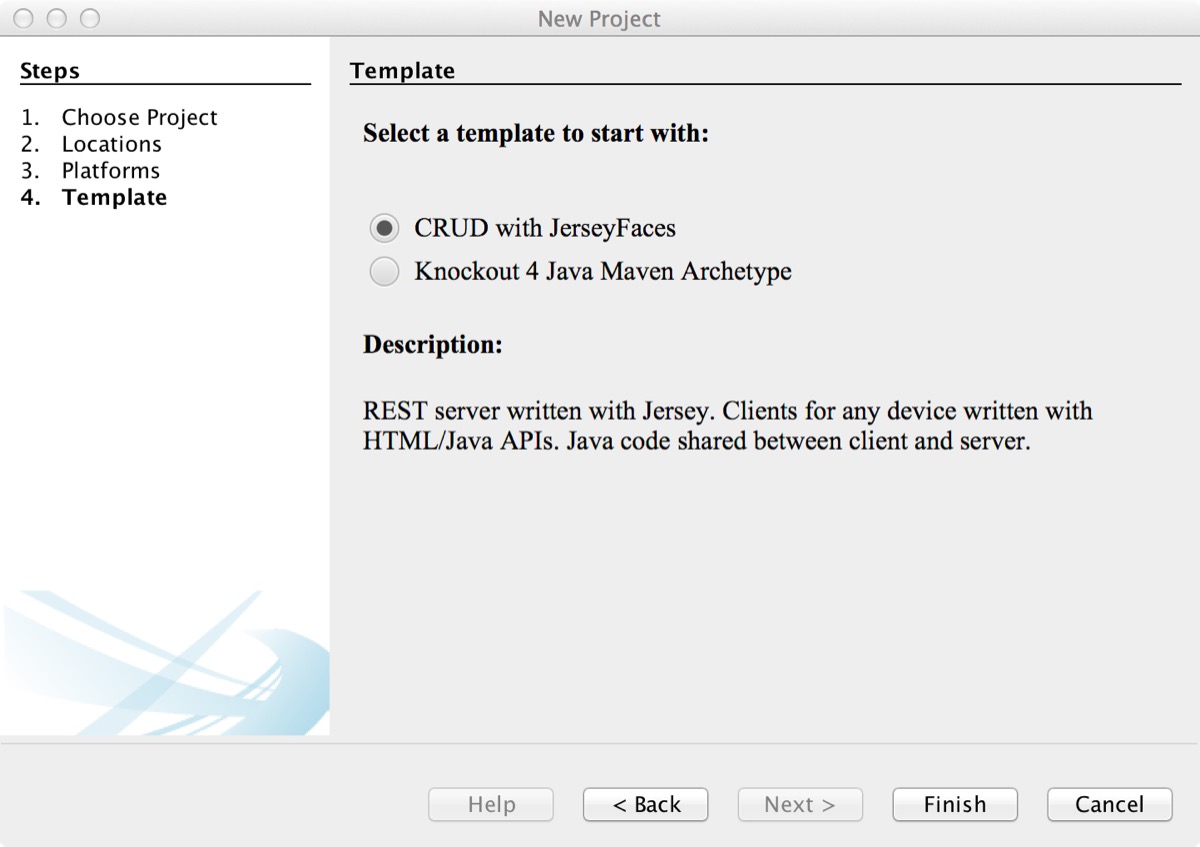
When you reach the final wizard step Select a Template to start with where you should select CRUD with Jersey Faces.
On the command line you could use this command instead:
mvn archetype:generate
    -DarchetypeGroupId=com.dukescript.archetype
    -DarchetypeArtifactId=crud4j-archetype
    -DarchetypeVersion=0.10 # or later version like 0.18
NetBeans will now automatically start a build; on Eclipse or with plain Maven you’ll have to do that manually.
Using Wildfly as the server
The purpose of our Jersey sample is to show how you can interact with a server via JSON messages. So the only purpose of the server module is to answer the requests from the client. For a more traditional setup you can simply create a regular web project, e.g. using the Maven Web Application project template.
Here’s how you can use Wildfly as the server.
In the Parent Project, right-click “Modules” and select “Create New Module” from the context menu. In the wizard that pops up choose “Maven > Web Application”. In the second step you can select a server. Choose Wildfly here. If it’s not in the drop down list, click add and point it to the Wildfly dir. Then confirm the settings and finish the wizard.
Now use “New > Web Services > Restful WebService from pattern” and create a Singleton Web Service. This is only needed to configure the project for Web Services. You can delete the class you just created after that. Now add the following class to your project:
@javax.ws.rs.ApplicationPath("webresources")
public class ApplicationConfig extends Application {

    @Override
    public Set<Class<?>> getClasses() {
        Set<Class<?>> resources = new java.util.HashSet<>();
        addRestResourceClasses(resources);
        return resources;
    }

    /**
     * Do not modify addRestResourceClasses() method.
     * It is automatically populated with
     * all resources defined in the project.
     * If required, comment out calling this method in getClasses().
     */
    private void addRestResourceClasses(Set<Class<?>> resources) {
        resources.add(fully.qualified.path.to.ContactsResource.class);
    }

}
Now copy the ContactsResource to the new project and delete the old server project. Make sure to add the project with „Shared Client Server Data Structures“ as a dependency, so you can again reuse the data model. If you’re using NetBeans you’ll now see the ContactsResource in the IDE under the “Restful Web Services” Node. That’s it, you can now start the server and point the client to this more traditional Web Application.
Using JPA
We’ll use javadb for the database, since it’s easiest to setup. You just need to add this to your pom.xml:
        <dependency>
            <groupId>javadb</groupId>
            <artifactId>javadb</artifactId>
            <version>10.10.2.0</version>
            <type>zip</type>
        </dependency>
        <dependency>
            <groupId>javadb</groupId>
            <artifactId>javadb-client</artifactId>
            <version>10.10.2.0</version>
            <type>zip</type>
        </dependency>
We’ll now define a persistence unit ( File | New file | Persistence | Persistence unit ). Choose “EclipseLink (JPA 2.1)” as the Persistence Provider and leave the DataSource empty. Open the Source view and change the file like this:
<?xml version="1.0" encoding="UTF-8"?>
<persistence version="2.0" xmlns="http://java.sun.com/xml/ns/persistence" xmlns:xsi="http://www.w3.org/2001/XMLSchema-instance" xsi:schemaLocation="http://java.sun.com/xml/ns/persistence                 http://java.sun.com/xml/ns/persistence/persistence_2_0.xsd">
    <persistence-unit name="dukeDB" transaction-type="JTA">
        <provider>org.eclipse.persistence.jpa.PersistenceProvider</provider>
        <exclude-unlisted-classes>true</exclude-unlisted-classes>
        <mapping-file>META-INF/orm.xml</mapping-file>

        <exclude-unlisted-classes>true</exclude-unlisted-classes>
        <properties>
            <property name="javax.persistence.jdbc.url"
                      value="jdbc:derby:./dukescript;create=true"/>
            <property name="javax.persistence.jdbc.driver"
                      value="org.apache.derby.jdbc.EmbeddedDriver"/>
            <property name="javax.persistence.schema-generation.database.action"
                      value="drop-and-create"/>
        </properties>
    </persistence-unit>
</persistence>
In order to use JPA for persisting Objects, you can either use Annotations or an XML-File with the mapping information. We’ll use an XML-File, as the Model classes are generated and cannot easily be changed. This way we also do not need to introduce a JPA dependency on the client. The modified persistence.xml references the mapping-file “orm.xml” for this.
Create file orm.xml next to the persistence.xml:
<?xml version="1.0" encoding="UTF-8" ?>
<entity-mappings xmlns="http://java.sun.com/xml/ns/persistence/orm"
                 xmlns:xsi="http://www.w3.org/2001/XMLSchema-instance"
                 xsi:schemaLocation="http://java.sun.com/xml/ns/persistence/orm orm_2_0.xsd"
                 version="2.0">

    <entity class="com.dukescript.demo.leads.shared.Contact" access="FIELD">
        <named-query name="findAllContacts">
            <query>Select c from Contact c</query>
        </named-query>
        <named-query name="findContactById">
            <query>Select c from Contact c where c.prop_id = :id</query>
        </named-query>
        <attributes>
            <id name="prop_id" >
                <generated-value/>
            </id>
            <one-to-many name="prop_phones" >
                <cascade>
                    <cascade-persist></cascade-persist>
                </cascade>
            </one-to-many>
            <one-to-one name="prop_address">
                <cascade>
                    <cascade-persist></cascade-persist>
                </cascade>
            </one-to-one>
            <transient name="proto"></transient>
        </attributes>
    </entity>
    <entity class="com.dukescript.demo.leads.shared.Address" access="PROPERTY">
        <attributes>
            <id name="street">
            </id>
            <id name="town">
            </id>
        </attributes>
    </entity>
    <entity name="phone" class="com.dukescript.demo.leads.shared.Phone" access="PROPERTY">
        <attributes>
            <id name="number">
            </id>
        </attributes>
    </entity>
</entity-mappings>
Please make sure to replace the fully qualified path of the three Model classes (Phone, Address, Contact) with the one that applies for your project. Otherwise the classes can’t be found.
Now we need to change the application to use the PersistenceUnit. We’ll first create class ApplicationResources to Produce the Unit:
@ApplicationScoped
public class ApplicationResources {

    @PersistenceUnit
    private EntityManagerFactory em;

    @Produces @RequestScoped
    public EntityManager em(){
        return em.createEntityManager();
    }

}
Next we’ll change our ContactsResource class to use the PersistenceUnit:
@Path("/contacts/")
@Singleton
public final class ContactsResource {

    @Inject
    EntityManager entityManager;

    @GET
    @Produces(MediaType.APPLICATION_JSON)
    public List<Contact> allContacts() {
        List<Contact> contacts = null;
        Query query = entityManager.createNamedQuery("findAllContacts");
        contacts = query.getResultList();
        return contacts;
    }

    @GET
    @Produces(MediaType.APPLICATION_JSON)
    @Path("{id}")
    public Contact getContact(@PathParam("id") String id) {
        Query query = entityManager.createNamedQuery("findContactById");
        query.setParameter("id", id);
        Contact contact = (Contact) query.getSingleResult();
        return contact;
    }

    @POST
    @Consumes(MediaType.APPLICATION_JSON)
    @Produces(MediaType.APPLICATION_JSON)
    public List<Contact> addContact(Contact c) {
        validate(c);
        List<Contact> contacts = null;
        entityManager.getTransaction().begin();
        entityManager.persist(c);
        entityManager.getTransaction().commit();
        Query query = entityManager.createNamedQuery("findAllContacts");
        contacts = query.getResultList();
        return contacts;
    }

    @DELETE
    @Consumes(MediaType.APPLICATION_JSON)
    @Produces(MediaType.APPLICATION_JSON)
    @Path("{id}")
    public List<Contact> removeContact(@PathParam("id") String id) {
        List<Contact> contacts = null;
        Query query = entityManager.createNamedQuery("findContactById");
        query.setParameter("id", id);
        Contact contact = (Contact) query.getSingleResult();
        entityManager.getTransaction().begin();
        entityManager.remove(contact);
        entityManager.getTransaction().commit();
        query = entityManager.createNamedQuery("findAllContacts");
        contacts = query.getResultList();
        return contacts;
    }

    @PUT
    @Consumes(MediaType.APPLICATION_JSON)
    @Produces(MediaType.APPLICATION_JSON)
    @Path("{id}")
    public List<Contact> updateContact(@PathParam("id") String id, Contact newContact) {
        List<Contact> contacts = null;
        entityManager.getTransaction().begin();
        Contact merged = entityManager.merge(newContact);
        entityManager.flush();
        String lastName = merged.getLastName();
        entityManager.getTransaction().commit();

        Query query = entityManager.createNamedQuery("findAllContacts");
        contacts = query.getResultList();
        return contacts;
    }

    private static void validate(Contact c) {
        if (c.getValidate() != null) {
            throw new NotAcceptableException(c.getValidate());
        }
        if (c.getAddress().getValidate() != null) {
            throw new NotAcceptableException(c.getAddress().getValidate());
        }
        for (Phone phone : c.getPhones()) {
            String err = phone.getValidate();
            if (err != null) {
                throw new javax.ws.rs.NotAcceptableException(err);
            }
        }
    }
}
Now run the server application. It should open the browser and display a hello world message. In your NetBeans project open the “Restful Web Services” node and right-click “ContactsResource”. Choose “Test Resource Uri” from the context menu. This will open the resource in the browser. You can now copy the URL from the Browsers address field.
Testing the client
Now we’re ready to run the client. Run project “crud General Client Code”. In the URL field paste the URL you just copied and connect. That’s it: The addresses you enter will now be persisted via JPA.