Getting started with DukeScript
Did we convince you to give it a try and do some demos? Then you've got two options, either use our Maven archetypes and configure everything in an IDE independent way, or simply use NetBeans 9. We suggest to do the latter, because it simplifies things for you a lot. It's just a few easy steps:
Create new Project
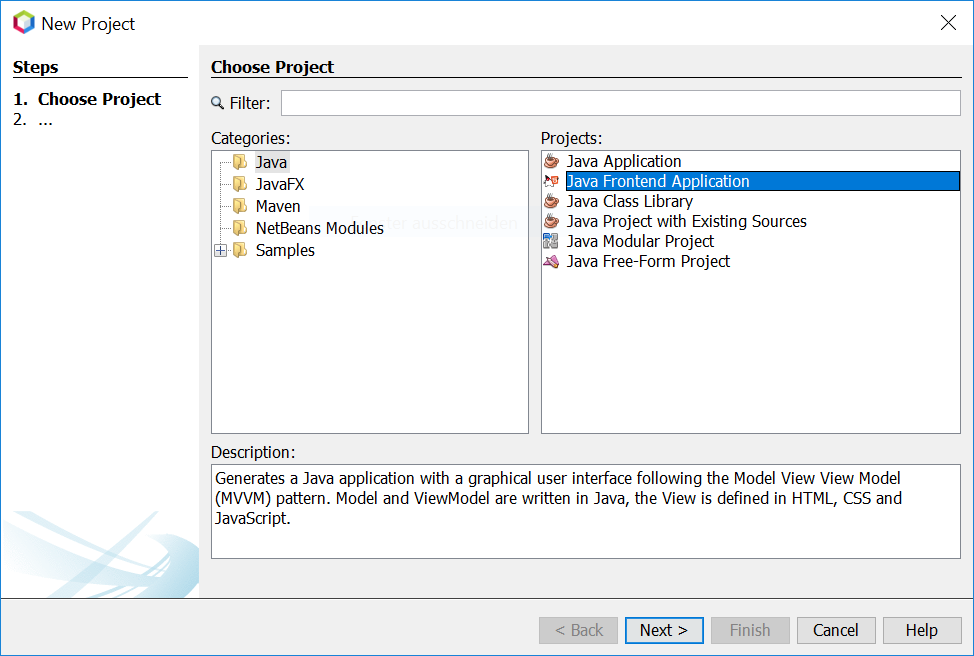
Now create new project (File | New Project...). In the New Project Wizard switch to category Java. Choose the template Java Frontend Application (If you don't see the Java Frontend Application item, make sure you are running on Oracle JDK with JavaFX included):
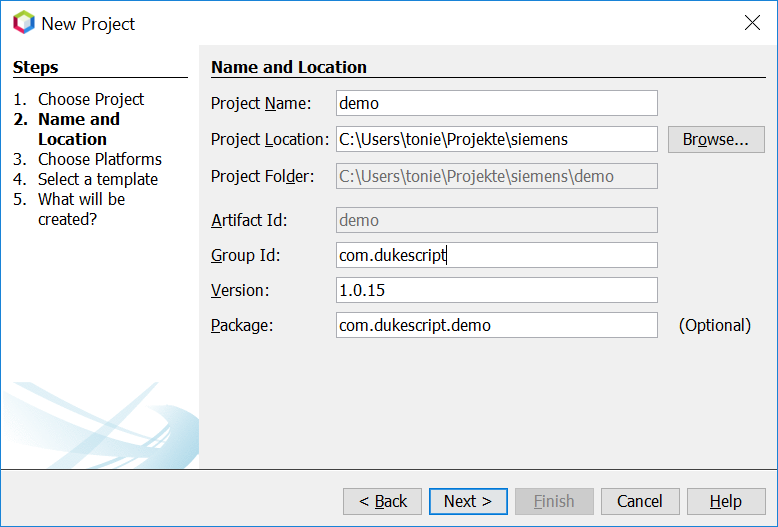
In Step 2 you need to specify the location where to create your project and the Maven coordinates.
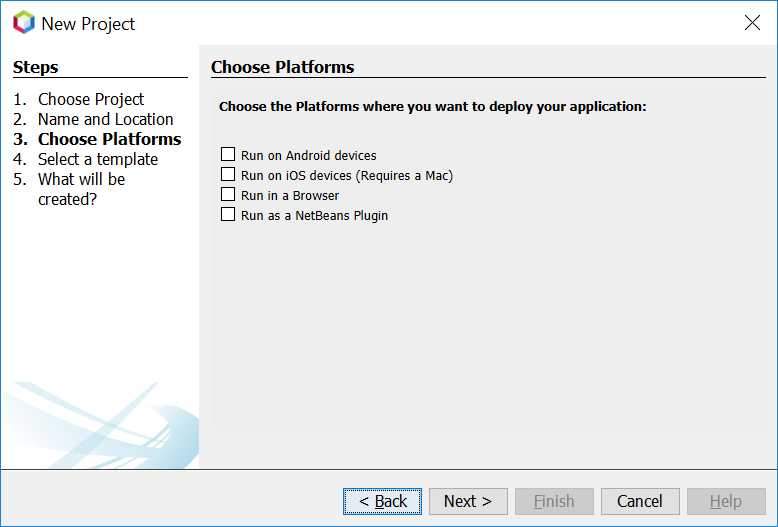
The next wizard steps ask to what platforms you would like to deploy. The options are Android, iOS, Browser and NetBeans Plugin. In addition to that a Desktop Client will automatically be created for you. This is the one that is used for testing and debugging:
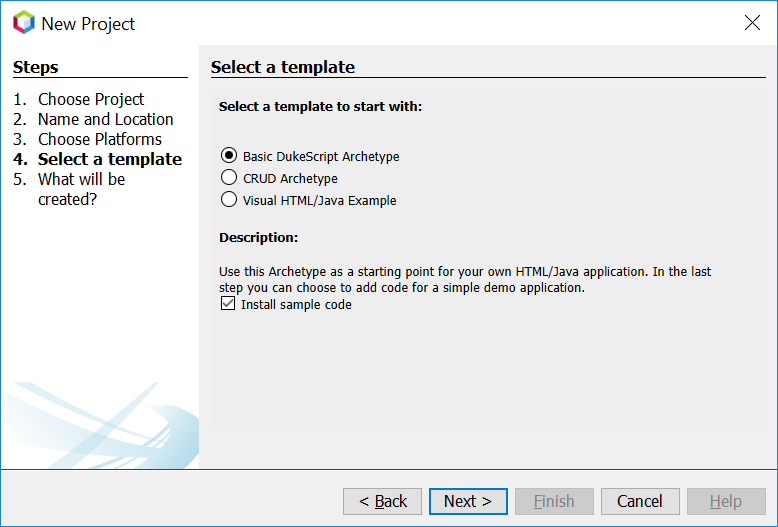
In Step 4 you can choose between the available project templates. Let's go for the simplest one Basic DukeScript Archetype. Also make sure you select "Install sample code", so we have a working sample to play with.
The Maven archetype will create a parent project, that contains several subprojects. There's always the "General Client Code". This is the project that contains the actual source Java code. Use this to develop, test and debug your project. There's also a separate project for JavaScript Libraries. The code in here makes calls to JavaScript and back, which is sometimes necessary to achieve what you want.
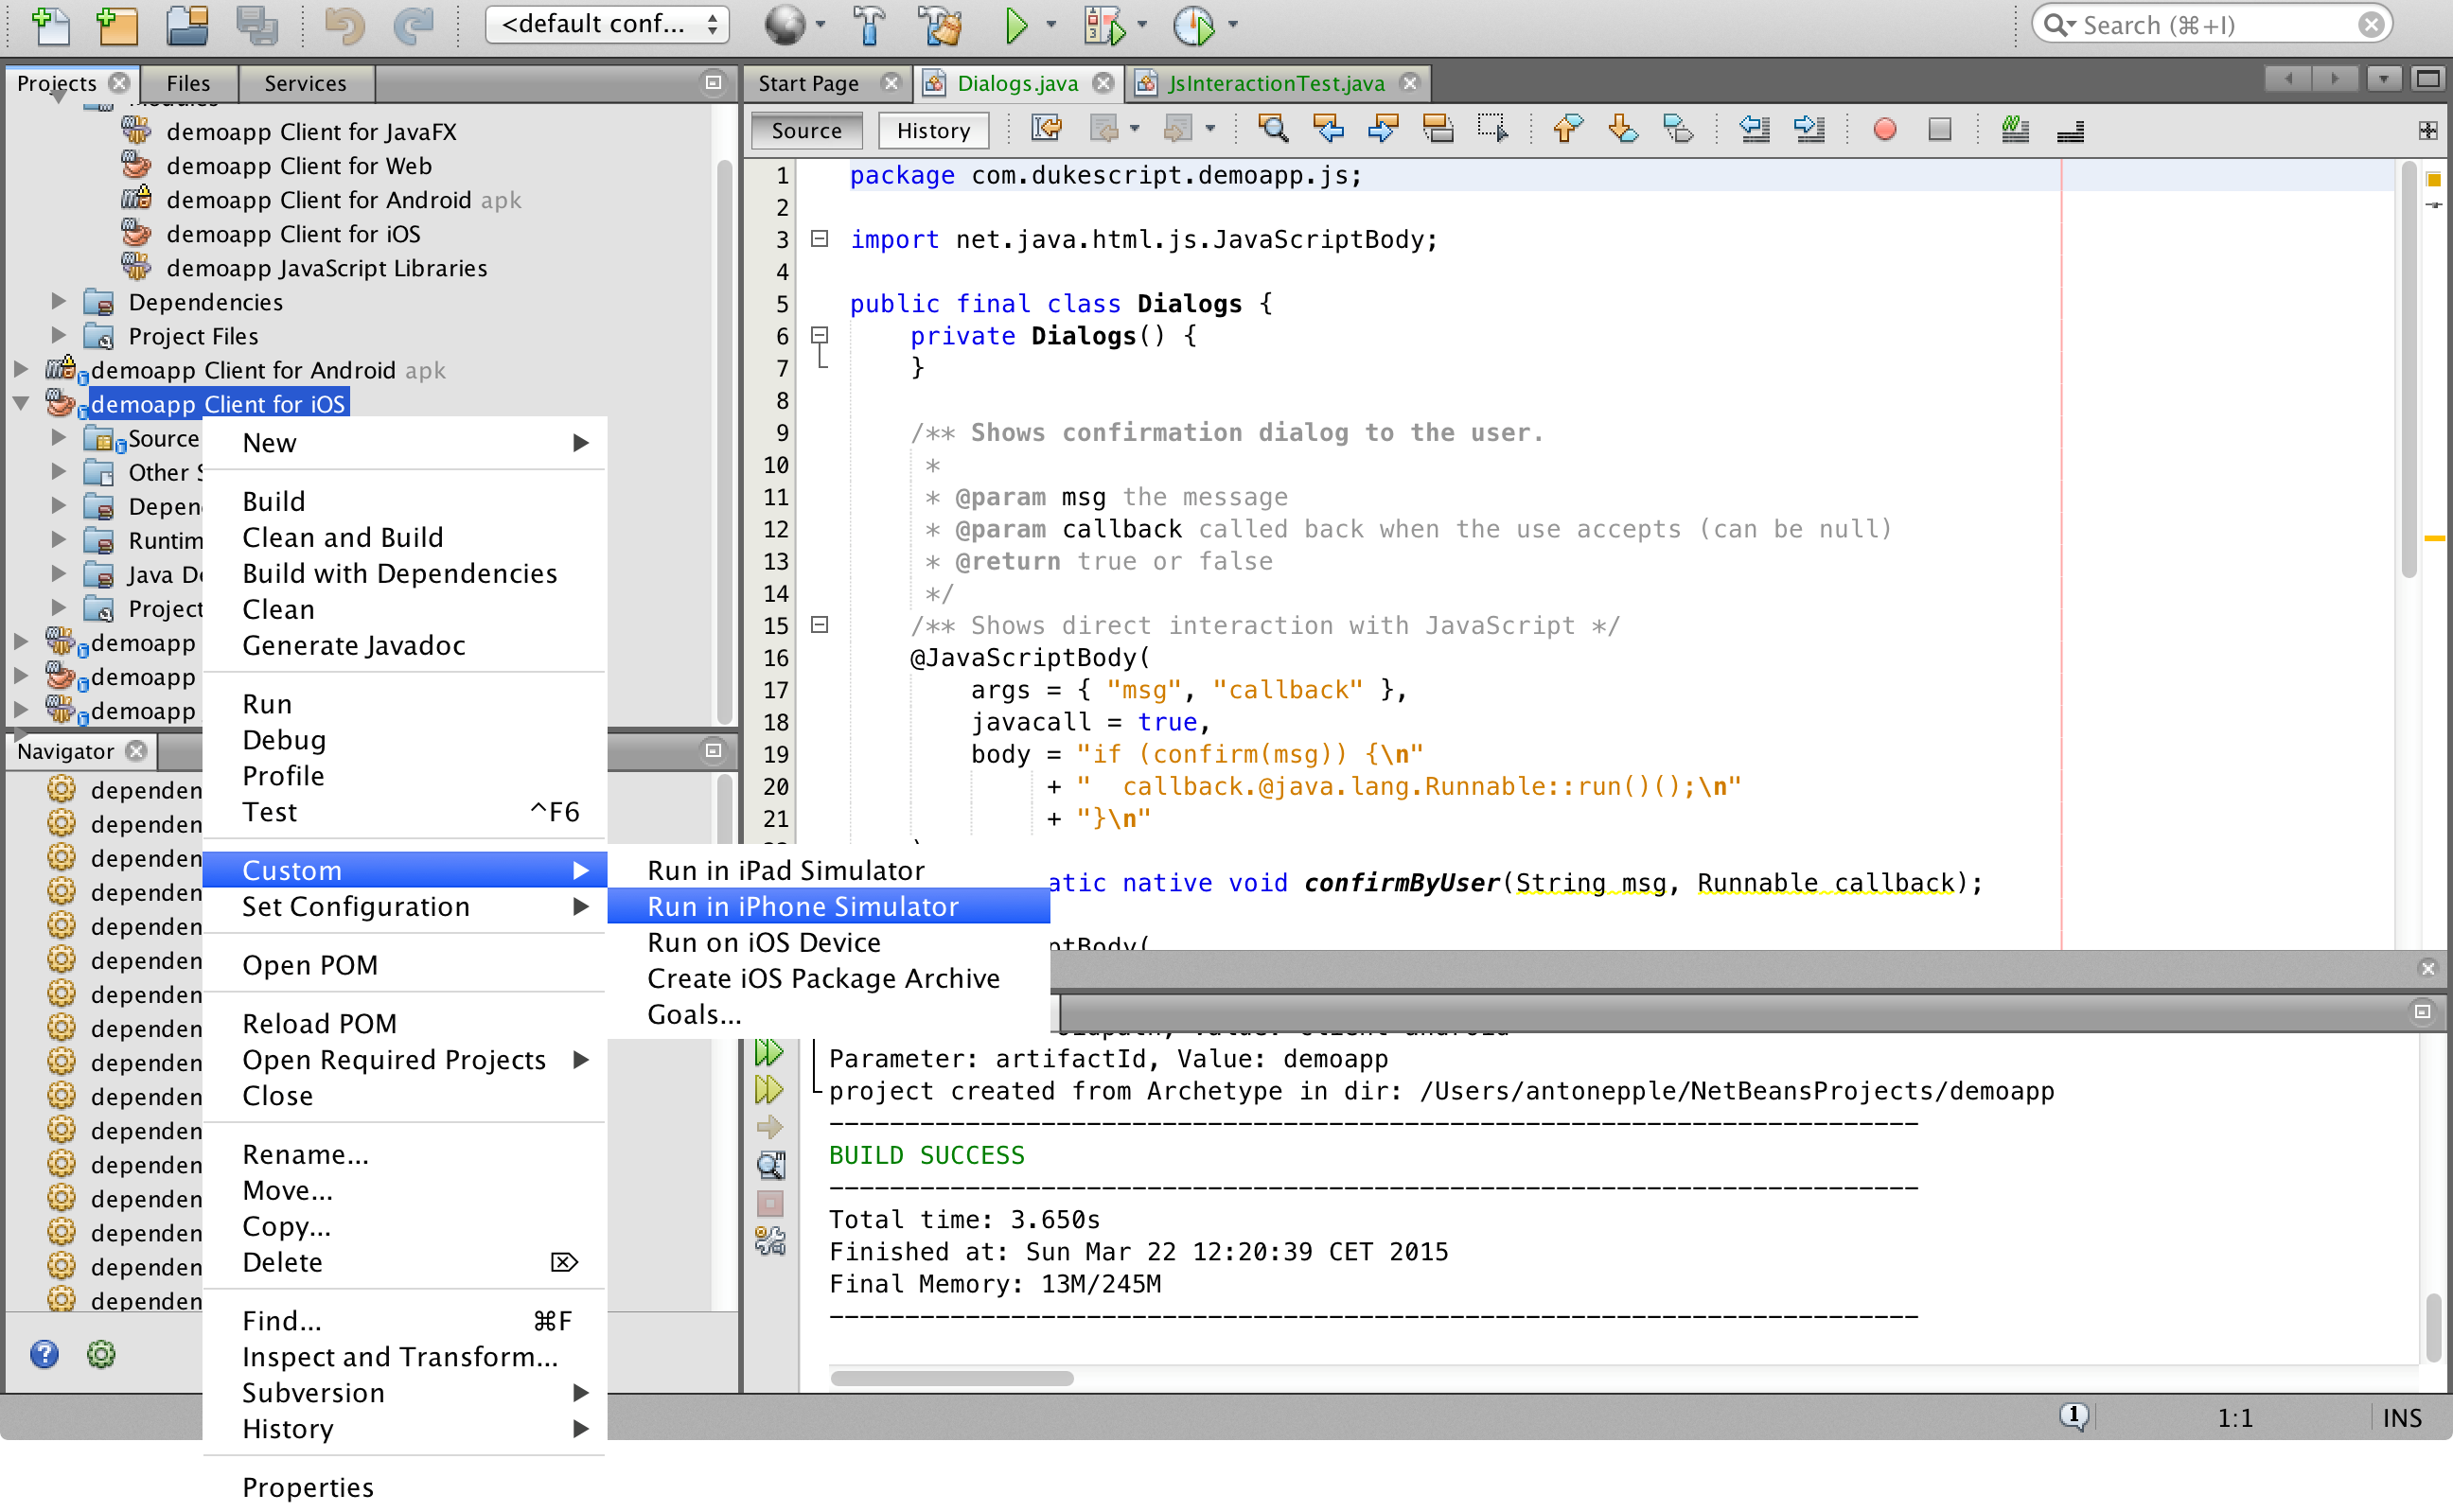
For each target platform you selected in the wizard, there will also be a project. These projects can be used to deploy and test the project to the individual platforms. In NetBeans each of the projects context menu has a submenu "custom" with entries that apply only to the deployment platform. For example the iOS project has an entry that allows you to run in an iPad simulator or deploy to a real iOS device, while the Android project has entries for running on an attached Android device.
Enjoy writing once and running everywhere with Java!
Understanding the Example Application
Now that we've created the application and tried it, let's have a closer look at the application and see how it works. In this section you'll learn how the view and the model are defined, and how they're bound together. Open the project that ends with "General Client Code".
The View
Let's first have a look at how the view is defined, how the animation works and how the view is bound to the model.
Animation via CSS
In DukeScript, the view is not created in Java code, but in a declarative format, namely in HTML. In our example project the view is defined in the file 'src/main/webapp/pages/index.html'. In the Project Tab, you can easily locate it under 'Web Pages/pages'. The page is just simple HTML. To preview it, right-click it and choose 'View' from the Menu. It will open in a browser. Now open the file and have a look at it's content. The head contains some CSS:
@-webkit-keyframes spin {
    0% { -webkit-transform: rotate(0deg); }
    100% { -webkit-transform: rotate(360deg); }
}

input {
    width: 100%;
}

.rotate {
    -webkit-animation-name: spin;
    -webkit-animation-duration: 3s;
    -webkit-animation-iteration-count: infinite;
    -webkit-animation-direction: alternate;
}

#scene {
    position: relative;
    top: 60px;
    text-align: center;
}

#words span {
    border: 1px solid #ccc;
    background: rgba(255,255,155,0.8);
    text-align: center;
    font-size: 30px;
    -webkit-box-shadow: inset 0 0 40px rgba(0,0,0,0.4);
    position: absolute;
}

#words span:nth-child(1) { left: 45%; top: 0px; }
#words span:nth-child(2) { left: 25%; top: 100px; }
#words span:nth-child(3) { left: 65%; top: 100px; }
#words span:nth-child(4) { left: 10%; top: 200px; }
#words span:nth-child(5) { left: 45%; top: 200px; }
#words span:nth-child(6) { left: 80%; top: 200px; }
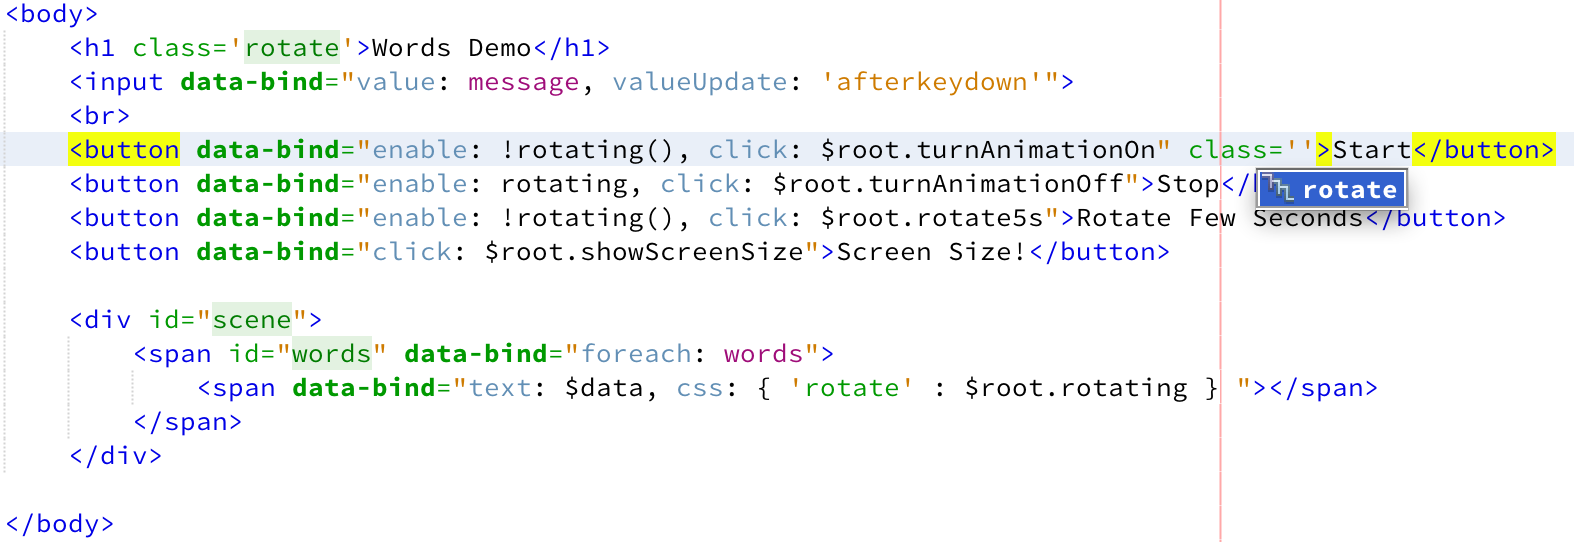
For simplicity the File contains the styles in-line, but you can also define your CSS in a separate File. Here we've defined the positions of the words, and the spinning animation. This is just standard CSS. Later in the example you'll see how the class 'rotate' is assigned to some elements to make them spin. To try out this style-class just assign it to one of the Buttons. Place the cursor inside one of the buttons and type "class='rotate'". Note how NetBeans helps you by offering you the class in code-completion:
Now preview the page again using right-click -> 'View'. You will see the effect of adding this class: The Button rotates.
Binding the View to the Model
Let's remove the class again and have a look at the rest of the file.
First there's a text input and some buttons. Each of these elements has a 'data-bind' attribute.
They are used to bind attributes of the Element to Properties of the data-model.
The basic idea behind this is that whenever the bound Properties of the data model change, the view will update itself automatically.
The binding also works in the opposite direction. We can define it so that e.g. entering a text in the input will automatically
update a bound property in the data model. The bindings are only defined in the view.
When we look at the datamodel later, you'll see that it doesn't have to reference the view at all.
This technique is known as the Model-View-ViewModel (MVVM) Pattern.
Binding with Knockout
DukeScript uses Knockout, a very popular JavaScript library for binding.
Knockout is very well documented, and we suggest that you explore this documentation to learn more about it.
Later in this tutorial there's also a section with more details on how to use Knockout.
For now it's sufficient to know what the 'data-bind'-attributes in our example are doing.
The input-Element has this data-bind directive:
data-bind="value: message, valueUpdate: 'afterkeydown'"This means that the 'value' attribute of the input is bound to the 'message' property of the datamodel.
This binding is bidirectional. When the datamodel's message-Property changes, the input will update.
And when the user enters some text in the Textfield (and thus modifies the 'value'-attribute), this will update the datamodels 'message'-Property.
The 'valueUpdate' defines when the value updates the data-model. In our case it's 'afterkeydown' meaning it happens instantly as the user types along.
Enabling and disabling Buttons via binding
Next we have the 'Start' and 'Stop' Buttons. Their data-bind directives look very similar. Both bind their 'enable'-Attribute to the rotating-Property of the data model.
The 'enable'-Attribute of a Button is a boolean. The Stop-Button is enabled, when the 'rotating'-property of the datamodel is 'true'. If the value in the data-model changes to 'false', the Button is automatically disabled as a result.
The Start-Button is enabled, when the 'rotating'-Property is 'false'. The boolean negation is indicated by the leading exclamation mark.
Both Buttons also have a 'click'-Binding. With this binding we declare what happens when the button is clicked.
Here a method of the datamodel is called in return. Datamodels can be nested; with '$root' the root of the datamodel is referenced.
In our case either the method 'turnAnimationOn' or 'turnAnimationOff' is called.
The 'Rotate Few Seconds'-Button is similar, it only calls a different Method called 'rotate5s'.
Another Button calls the Method 'showScreenSize'.
The Element with the id 'words' has a 'foreach'-Binding. The Property it binds to is words.
The 'foreach'-Binding obviously requires a Array-Property, and it does something for each Element of the Array.
What it does is defined in the inner span-Element: The 'text'-Attribute is bound to the Element ('$data').
With knockout we can also bind CSS-classes of an Element to Model-Properties. In our case the class 'rotate' is added when the 'rotating'-Property of the datamodel is 'true'.
We've already tried out the effect of this class. So it's obvious what happens when we set the datamodels 'rotating'-Property to 'true'.
The Model
In a 'normal' Knockout-Application the model-class referenced from the view is defined as JavaScript. DukeScript changes that in order to make the application better maintainable, testable and to leverage the superior tooling of Java.Simple Properties
Let's have a look at the DataModel now. It's defined in the File 'DataModel.java'. The package it sits in depends on the Maven-Coordinates you entered during Project creation. You can find it in the 'Source Packages'-Folder of the Project. The DataModel is annotated on class-level:
@Model(className = "Data", properties = {
    @Property(name = "message", type = String.class),
    @Property(name = "rotating", type = boolean.class)
})
The 'Model'-Annotation is evaluated at compile time. As a result a class is created. The name of this class is defined
via the 'classname'-Attribute. In our case the classname is 'Data'. In the Project-View of NetBeans you can find the generated class 'Data.java'
in a folder 'Generated Sources'. The benefit of this approach is that you don't need to write Setters or Getters for your Properties, or care about
the special requirements of a Model that works with Knockout.
Instead you define the Properties via the Annotations 'properties'-Attribute. In our case there's a Property 'message' of type String,
and a boolean-Property named 'rotating'. We've already seen these two Properties in our View Definition.
Computed Properties
But the View also uses a Property called 'words'.
@ComputedProperty static java.util.List<String> words(String message) {
    String[] arr = new String[6];
    String[] words = message == null ? new String[0] : message.split(" ", 6);
    for (int i = 0; i < 6; i++) {
        arr[i] = words.length > i ? words[i] : "!";
    }
    return java.util.Arrays.asList(arr);
}
This Property is not defined in the Annotation. The reason for this is, that the Array of Strings
returned from this method is computed by splitting the 'message'-Property into single words. This cannot be defined in a simple Annotation.
Instead we wrote a static Method of that name that does the computation. We annotated it with '@ComputedProperty'.
So the value of the 'words'-Property referenced in the View is the String-Array returned from this method.
The 'Function'-Annotation
You already saw that the view also calls a couple of Methods of the Model. Like the ComputedProperties these Methods are also defined
as static Methods and annotated with '@Function'. The Method 'turnAnimationOn' simply sets the rotating-Property to 'true'.
So it becomes obvious now, how the control flow works. The user clicks the Start-Button. This calls the Method 'turnAnimationOn'
The Method in turn changes the value of the 'rotating'-Property:
@Function static void turnAnimationOn(Data model) {
    model.setRotating(true);
}
As a result the CSS-class 'rotate' is added to the spans created from the words, and they start rotating.
What you've seen up to here is the basic usage of the APIs. The idea behind the framework is, that a normal developer does not have to deal with JavaScript at all.
But sometimes it's required to integrate other JavaScript functions.
In the workflow we've developed for DukeScript this is part of the role of API-Designers.
There's also an example of that in our demo application. Open the project with a name ending in
"JavaScript Libraries". It contains a class that shows how we define an API in DukeScript.
The class Dialogs provides a way to invoke javascript functions from Java.
/** Shows direct interaction with JavaScript */
@net.java.html.js.JavaScriptBody(
    args = { "msg", "callback" },
    javacall = true,
    body = "if (confirm(msg)) {\n"
         + "  callback.@java.lang.Runnable::run()();\n"
         + "}\n"
)
static native void confirmByUser(String msg, Runnable callback);
The '@JavaScriptBody'-Annotation
The @JavaScriptBody-Annotation makes it easy to execute JavaScript-Code. To use it you need to define a static native Method.
The Annotation has a parameter called 'body' which defines the JavaScript to execute. The value returned from the Method call
can either be a Java String or primitive Type, or a JavaScript-Object. The Method 'showScreenSize' that we call from the view in turn
calls such a 'native' Method called 'screenSize'. This Method returns a String which is automatically converted to a Java String.
The @JavaScriptBody-Annotation also makes it easy to pass arguments to the JavaScript. This is done via the 'args'
parameter. The Method 'confirmByUser' takes a String and a Runnable as arguments. You can see in the Annotation that these two
Arguments are declared in the 'args'-Parameter of the Annotation. Like this we can use them in the JavaScript. In case of a Java Object, we can even call it's methods
following a standardized syntax. This is how the Runnable is executed from the confirmation Dialog. We'll have a closer look at this syntax later.
The @JavaScriptBody Annotation makes calls to JavaScript typesafe for the caller and hides the JavaScript from 'normal' users.
This makes applications maintainable and the Compiler can find Bugs at compiletime that would otherwise occur at Runtime and require extensive testing.
Putting it all together
Now that we have looked at Model and View and how they play together, the only thing that is missing is how to bind them together. This is the purpose of the Main class:
public final class Main {
    private Main() {
    }

    public static void main(String... args) throws Exception {
        BrowserBuilder.newBrowser().
            loadPage("pages/index.html").
            loadclass(Main.class).
            invoke("onPageLoad", args).
            showAndWait();
        System.exit(0);
    }

    /**
     * Called when the page is ready.
     */
    public static void onPageLoad() throws Exception {
        Data d = new Data();
        d.setMessage("Hello World from HTML and Java!");
        d.applyBindings();
    }

}
The main method of this class creates the main Window using BrowserBuilder.
What happens behind the scenes here depends on the platform. The platform specific HTML-Renderer-Window is created (newBrowser()) and loads the view using the loadPage method.
With loadclass the Controller is created, and with invoke we can define a Method to be invoked when the Page is loaded
The 'onPageLoad'-Method referenced here is responsible for creating the
Model and initializing the binding (applyBindings).
That's it, this is how the example application works and how the parts play together.