The Design Experiment
So DukeScript claims to have a clean separation of design and development? That’s nice, but many frameworks claim that, and often the statement doesn’t hold in practice. That’s why we decided to do an experiment. Is it possible with DukeScript to completely outsource the UI design to a designer with no knowledge of DukeScript, or a specific set of tools? Here’s what we found:
The state of UI Development
Designing user interfaces is a tough job and we usually spend a lot of time in our live as developers in dealing with design issues. The worst case is if we have to deal with all these issues in manually written code. That’s why for most UI technologies we have tools that allow us to design and test the User Interfaces via drag and drop.
Infographic by: Shane Snow. Shane Snow is an entrepreneur, writer, and recent Columbia MS/Digital Media graduate. Visit his personal site and follow him on Twitter @shanesnow.
For Swing we have the Matisse GUI Builder in NetBeans and the Window Builder in Eclipse which help a lot getting the layout of forms right. For JavaFX there’s the SceneBuilder that helps us at least with FXML. But while it’s good to have them all of these tools are rather limited when it comes to slightly more complex designs.
With SceneBuilder for example you can drag and drop a Polygon on your design, but you have no means of changing it. It’s a triangle by default and you need to manually edit the FXML if you want to change that, e.g. make it a star shape. And while coding UIs manually is bad, “coding” (F)XML manually is horrible.
That’s why we decided to use HTML for DukeScript views. Layout and Styling with HTML is very well understood and there are tons of resources out there that help you get it right. Admittedly it’s not perfect, but there’s more information than for any other technology. You also have the best and most advanced tools available, and not just a single one, that seems abandoned and incomplete.
But still it’s us, the developers, who will get the mockups from the designer, and who will have to try to convert them, as pixel-perfect as possible to create the final design. That’s why we decided to do an experiment and see how far we can get in separating design and development. We decided to buy a readymade design and see if we can really use it with DukeScript.
The Setup
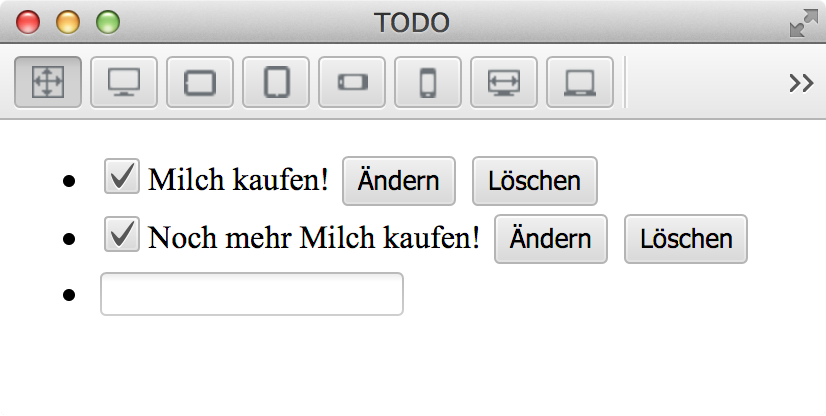
We wanted to create an app that is simple enough to show the full source code, so we decided to use our Todo-list example. This is the functional prototype:
In order to make this experiment really fair, we decided not to use a readymade design. If we would have hired a designer to do the design for us we would have been able to give him or her directions how to do it, what to use and what to avoid. So we started looking for a design. There are some websites out there that work similar to stock photo sites, but with website- or app- designs instead of the photos. Graphicriver is one of them. There we found a design that had all the buttons, etc. and looked nice:
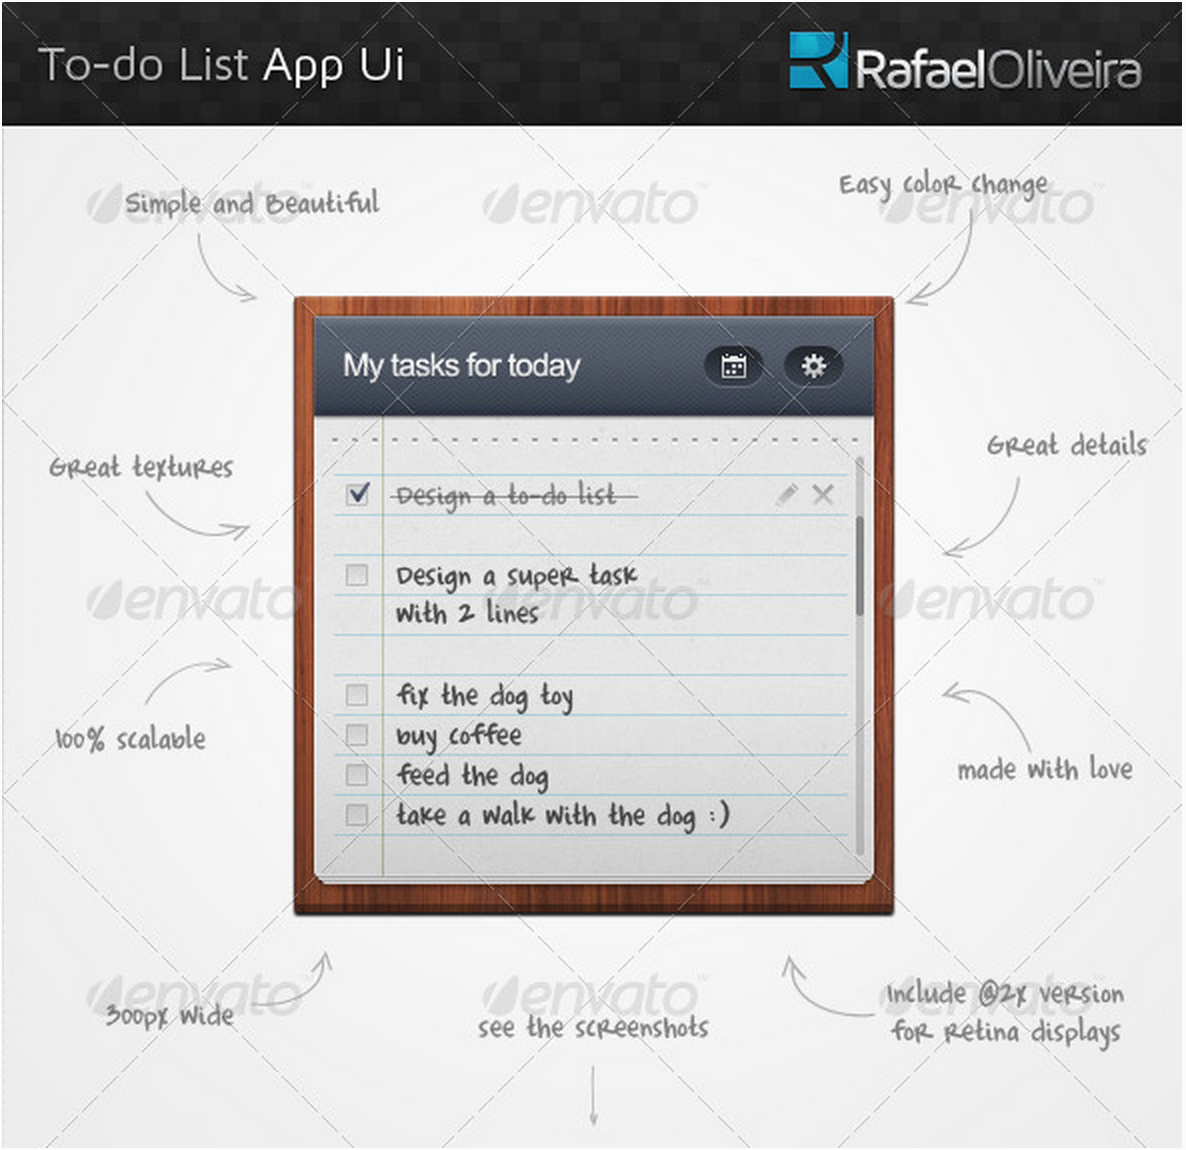
The design is in Photoshop format (PSD) just like the designs we typically get from the design department. So now we needed to convert that to HTML and CSS.
Finding the right Designer
Initially I tried to find a designer, but the offers I got were either too expensive (around 1000$), or I didn’t feel confident that the person really had the required skillset. Fortunately someone sent me a hint that there are tons of online services for that. I just needed to type “PSD to HTML” in Google and there they were, by the million…
We checked a couple of review sites to find one that isn’t too expensive while still producing good code, and ended up with Rapidxhtml.
There you simply upload your design and after that, you can decide what you want from them in very much detail. We went for a basic responsive layout. Some things like the styling of checkboxes and scrollbars are extras, because they’re not standardized across HTML-renderers, so we decided to skip them as we only wanted a simple example. In the end the calculated price for our package was $170. That sounded OK, so I pressed the submit button and waited…
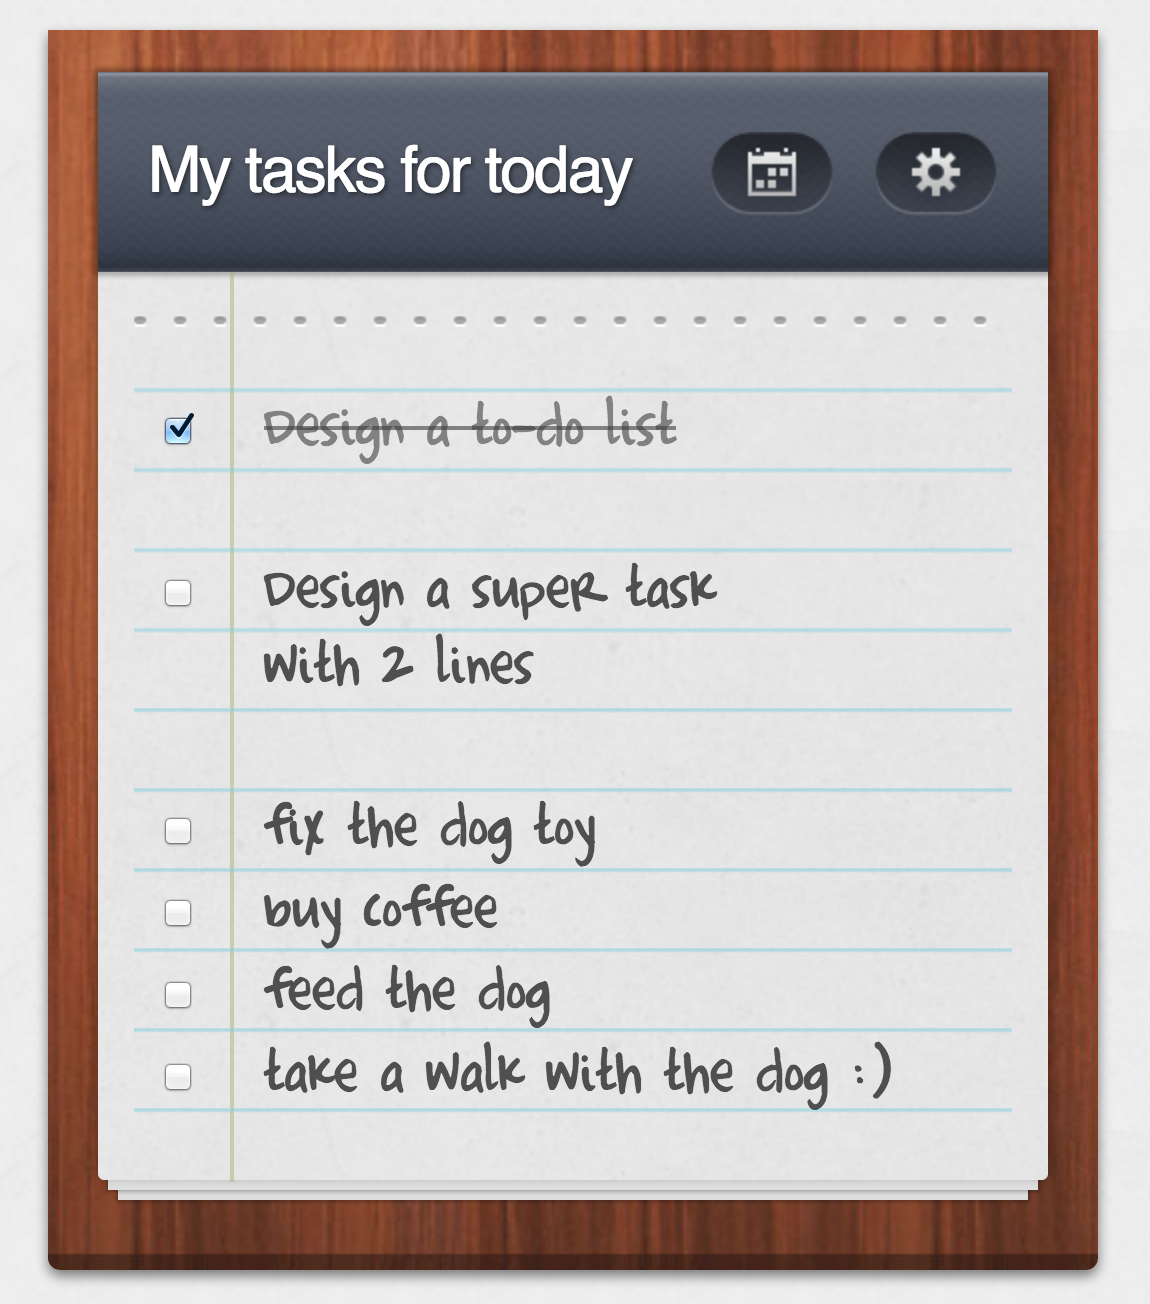
Six hours later I received an email from Rapidxhtml telling me my design was ready for download. That was faster than expected (the offers I had received up until then were estimating between 2 days and several weeks). I did so and the result looked pretty good at first sight, but didn’t resize. I wrote back and another hour later I received an updated version that resized. Here’s what the design looks like:
Working with the design
There were some more minor differences between the design and the result, and I wrote back. There was no reply, so I’d suggest that for a real project it’s probably better to go for a premium service ( like psd2html ), or work with a designer you know. But the remaining problems weren’t severe, so I decided to have a closer look at the HTML and CSS. It looked nice, well structured and I could understand what was going on. Here’s the relevant section of the HTML:
<div id="box">
  <div class="box-cont">
    <header class="box-header">
      <div class="box-title">My tasks for today</div>
      <div class="box-links"><a href=""><img src="images/btn-cal.png" alt="" /></a><a href=""><img src="images/btn-settings.png" alt="" /></a></div>
    </header>
    <section class="todo">
      <section class="todo-bg">
        <ul class="todo-list">
          <li class="done"><input type="checkbox" name="" class="toggle" checked="checked" /> Design a to-do list <span class="btns"><a href=""><img src="images/icon-edit.png" alt="" /></a><a href=""><img src="images/icon-delete.png" alt="" /></a></span></li>
          <li><input type="checkbox" name="" class="toggle" /> Design a super task<br />with 2 lines <span class="btns"><a href=""><img src="images/icon-edit.png" alt="" /></a><a href=""><img src="images/icon-delete.png" alt="" /></a></span></li>
          <li><input type="checkbox" name="" class="toggle" /> fix the dog toy <span class="btns"><a href=""><img src="images/icon-edit.png" alt="" /></a><a href=""><img src="images/icon-delete.png" alt="" /></a></span></li>
          <li><input type="checkbox" name="" class="toggle" /> buy coffee <span class="btns"><a href=""><img src="images/icon-edit.png" alt="" /></a><a href=""><img src="images/icon-delete.png" alt="" /></a></span></li>
          <li><input type="checkbox" name="" class="toggle" /> feed the dog <span class="btns"><a href=""><img src="images/icon-edit.png" alt="" /></a><a href=""><img src="images/icon-delete.png" alt="" /></a></span></li>
          <li><input type="checkbox" name="" class="toggle" /> take a walk with the dog :) <span class="btns"><a href=""><img src="images/icon-edit.png" alt="" /></a><a href=""><img src="images/icon-delete.png" alt="" /></a></span></li>
        </ul>
      </section>
    </section>
  </div>
</div>
Next I started applying the design to my Todo-list sample. The changes I had to make were very straightforward. I removed the demo content of the list and added some data-bind directives instead:
<div id="box">
<div class="box-cont">
<header class="box-header">
<div class="box-title">My tasks for today</div>
<div class="box-links"><a href=""><img src="images/btn-cal.png" alt="" /></a><a href=""><img src="images/btn-settings.png" alt="" /></a></div>
</header>
<section class="todo">
<section class="todo-bg">
<ul class="todo-list" >
<!-- ko foreach: tasks -->
<li>
<!-- ko ifnot: $root.editing()===$data -->
<input type="checkbox" name="" class="toggle" data-bind="attr:{checked: complete}"/>
<span data-bind="text: title">
</span>
<span class="btns">
<img src="images/icon-edit.png" alt="" data-bind="click: $root.editTask" />
<img src="images/icon-delete.png" alt="" data-bind="click: $root.deleteTask" />
</span>
<!-- /ko -->
<!-- ko if: $root.editing()===$data -->
<form data-bind="submit: $root.stopEditing">
<input type="text" data-bind="textInput: title"/>
</form>
<!-- /ko -->
</li>
<!-- /ko -->
<li>
<form data-bind="submit: addTask">
<input type="text" data-bind="textInput: input"/>
</form>
</li>
</ul>
</section>
</section>
</div>
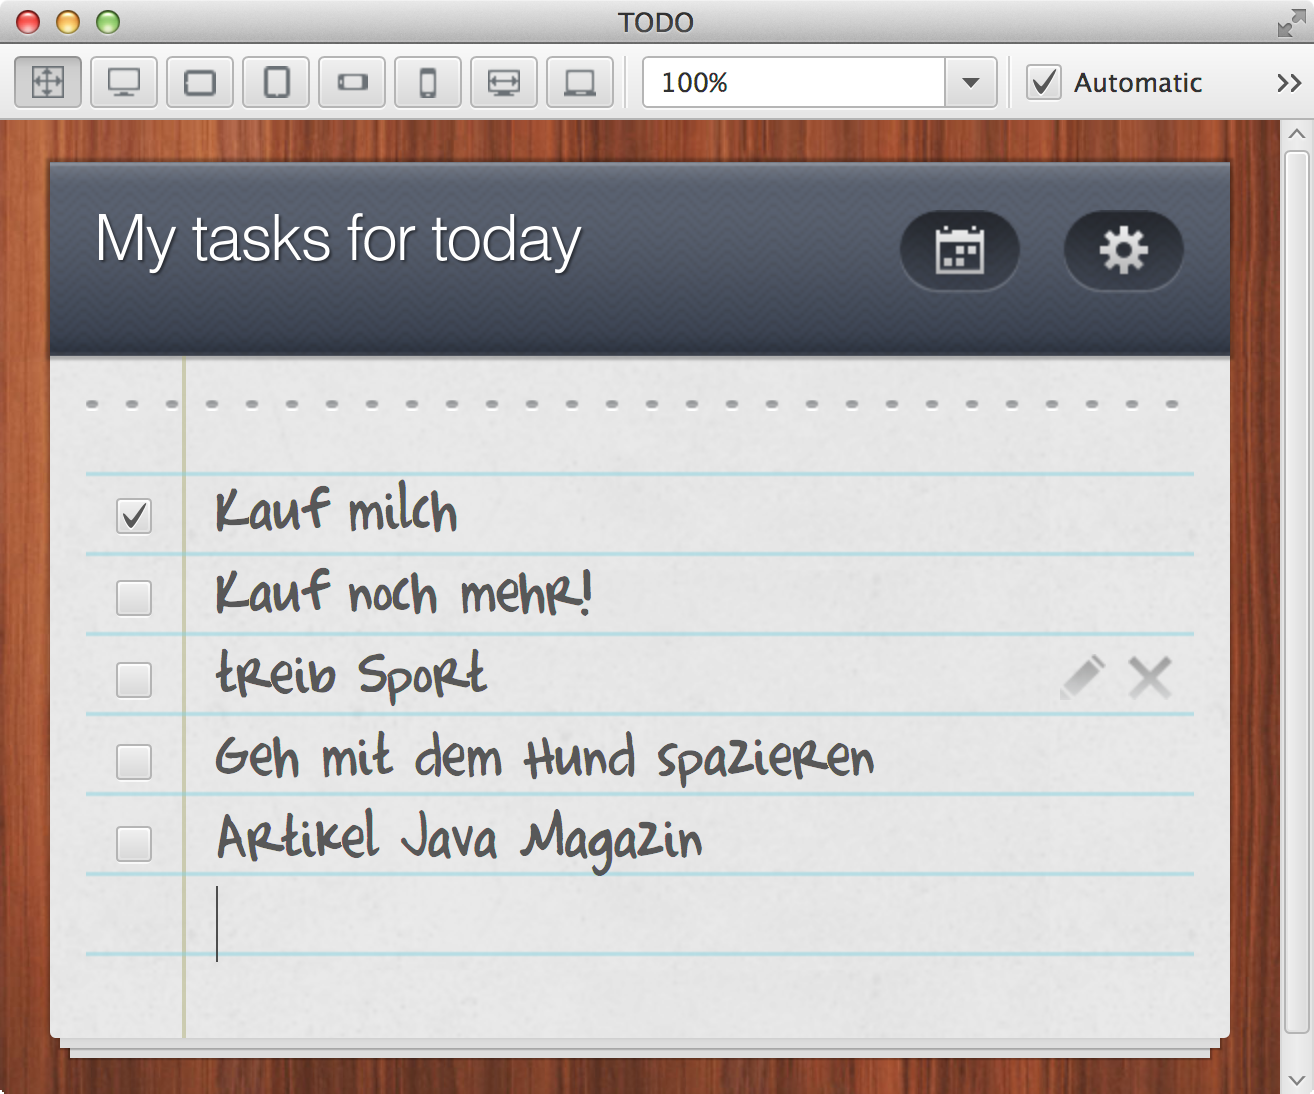
</div>Running the example showed the expected result:
I fixed some minor problems in the html and css, and made the project more responsive by hiding some paddings and elements on smaller devices, but nothing fancy. There are some tricks that help an app behave like an app, and not a website, and I applied some of them, e.g. to prevent the “scroll/bounce effect” on iOS, I used this:
        <script type="text/javascript" >
            document.ontouchmove = function (event) {
                event.preventDefault();
            };</script>
Normally I would have asked the designer to fix it, but with the online service that obviously didn’t work. So building a longer term relationship with your designer is beneficial. But even with this suboptimal setup, I was able to get a result quite quickly. After about an hour of changes the application was ready.
The result
Was the experiment a success? I spent 174$ for it (4$ for the PSD and $170 for the conversion). It took 7 hours to get from the design to the HTML including a fix. The result could be used more or less unmodified in the app. So, yes, I think it was a very successful experiment!
Try it for yourself, there are plenty of nice app designs out there that you can convert to an app using DukeScript, no design skills required!
You can download and test the result yourself: